NOT Panzanella – Making Bread the star ingredient

I have just started to get into a routine on Saturday mornings which goes like, get up, grab a cup of tea, head over to Waitrose as soon as possible, hit the Bread counter. Why, because Richard Bertinet Bread has come to Newbury and it sells quickly!

WP_20140525_18_52_57_ProRichard is one of my food heroes, he seems to buck the industry when it comes to making bread, especially the kneading process which has to be seen, you can find some examples on YouTube but better still book one of his bread making courses, you can find them HERE. What I love about his products is that they are ‘aux naturelle’, the BEST Flour, Yeast, Salt and Water, that’s it, proper Bread. His Bread is now available in a number of shops including Waitrose, you can find a list of stockists HERE.

WP_20140526_10_03_09_ProFor this quick snack, you will need one of his Caramelised Onion, Cumin and Cheese Loaves, about 4 slices which you need to cube and fry in Butter/Olive Oil and Garlic. This Bread is rich and has LOADS of flavour and forms the basis for my take on a Tuscan dish called Panzanella. Where this version differs is I did not use old Sour Dough, I did not soak the bread, and instead, used  flavoursome Bread and fried it adding even more flavour with the Garlic, its VERY good (quote from the Wife!). You can now see where the name from this dish came from!

Jules NOT Panzanella

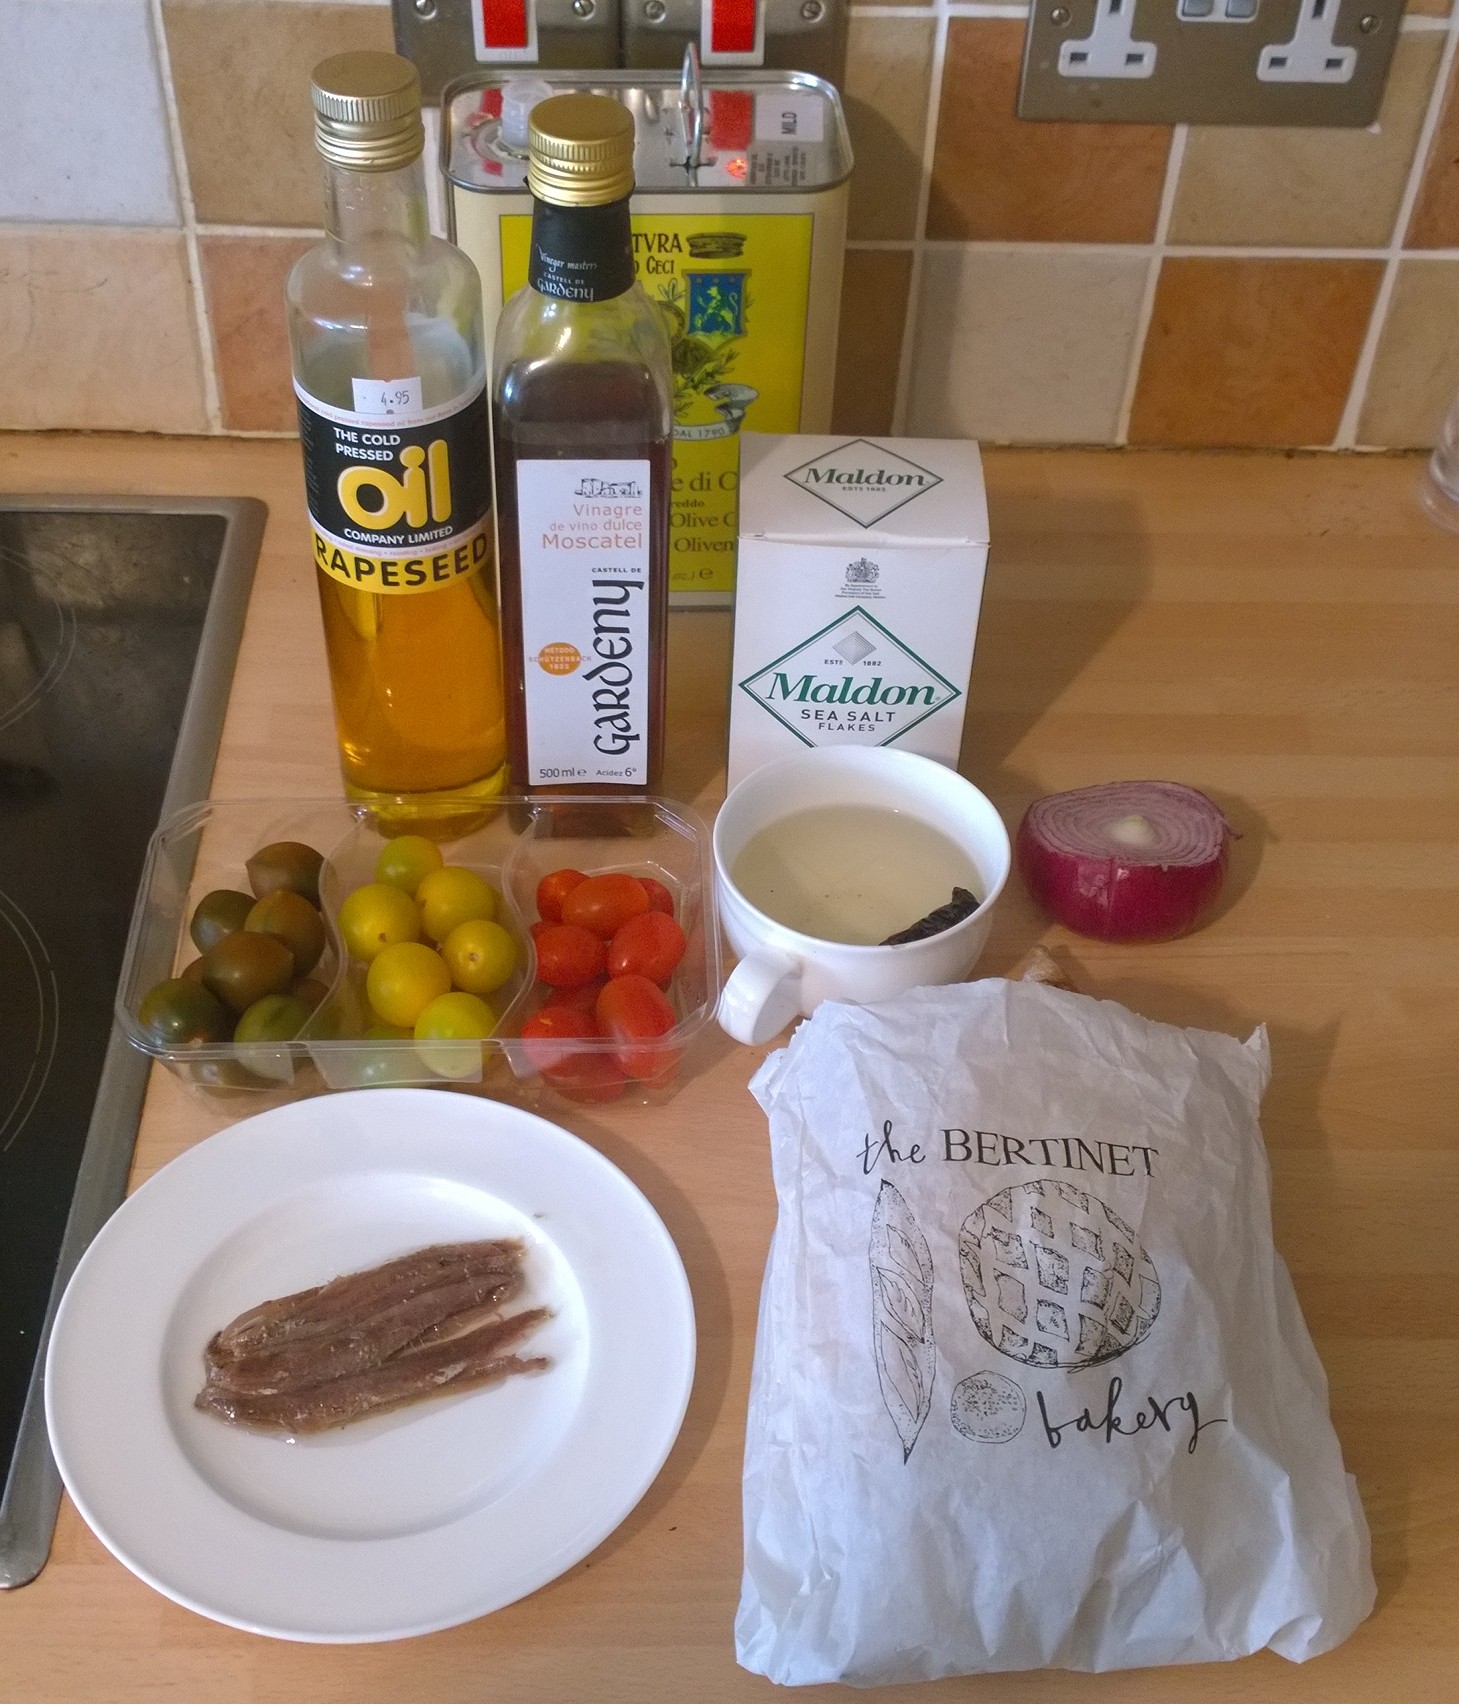
  • 4 Slices Richard Bertinet Caramelised Onion, Cumin and Cheese Bread
  • 4 Slices of Red Onion, finely chopped
  • 3 Tbls Rapeseed Oil
  • 1 Tbls Moscatel Vinegar (available from Ottolenghi’s online store) Not cheap but lasts ages.
  • 1 Chipotle Morito Chilli, soaked in hot water for 20 Mins (available HERE)
  • 250 grms Heritage Tomatoes, such as Chocolate Plum, Yellow Cherry, Red Angelle
  • 1 Baby Gem Lettuce
  • 2 Cloves garlic
  • 2 Spring Onions finely sliced
  • 50g Anchovies in Olive Oil (drained), LIGHTLY drizzled with a few drops of Moscatel Vinegar and leave for 15 mins

WP_20140525_19_25_12_Pro
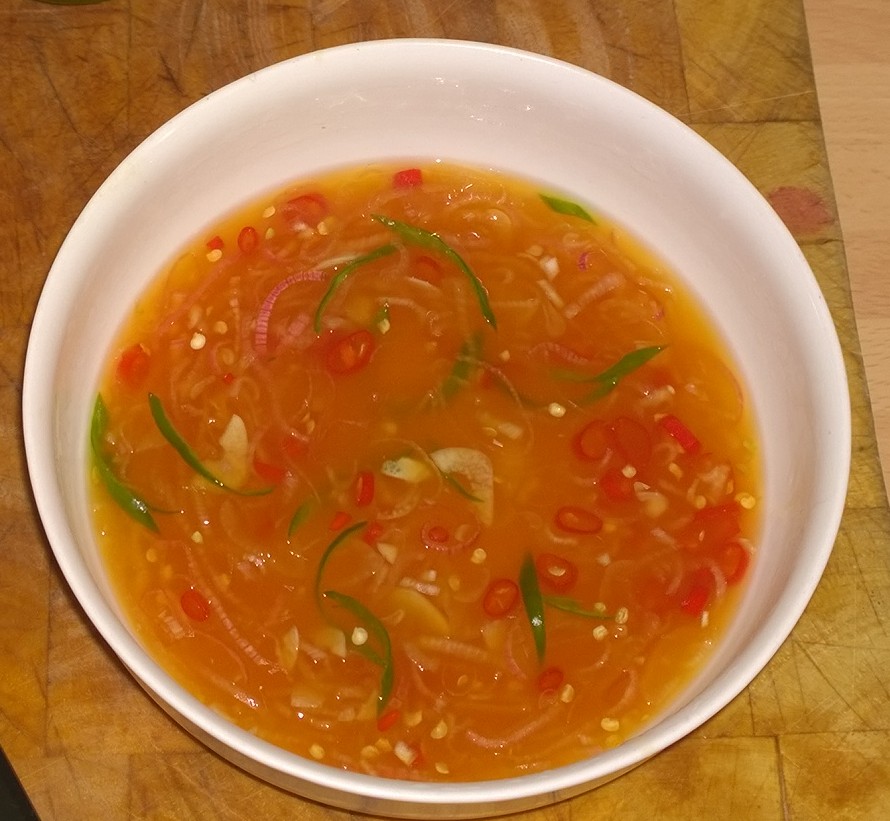
Firstly the dressing, take 3 Tbls Rapeseed Oil and 1 Tbls Moscatel Vinegar and whisk in a bowl until thoroughly combined, then add the finely chopped Red Onion and mix well. Cut the Chipotle Morito Chilli and cut in half, scrape out the seeds and membrane and finely chop, add to the dressing and season with Salt and Pepper and put to one side. The acid in the Vinegar will start to ‘cook’ the Onion, removing its harshness. Set aside for at least 30 minutes.

Next fry the Bread in Butter, Olive Oil and towards the end, add a couple of cloves of finely chopped Garlic, if you add it too soon it will burn and turn bitter, lightly season with some Maldon Sea Salt. Drain on some kitchen paper, you can keep warm in a oven set to 100 or so degrees.

WP_20140525_20_39_07_Pro
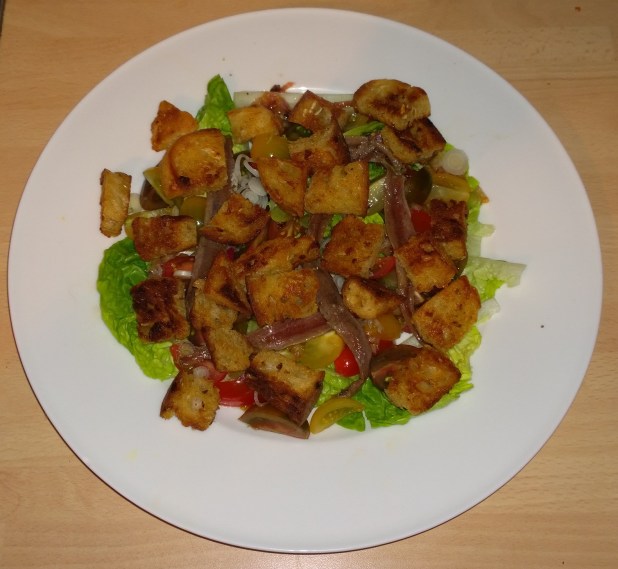
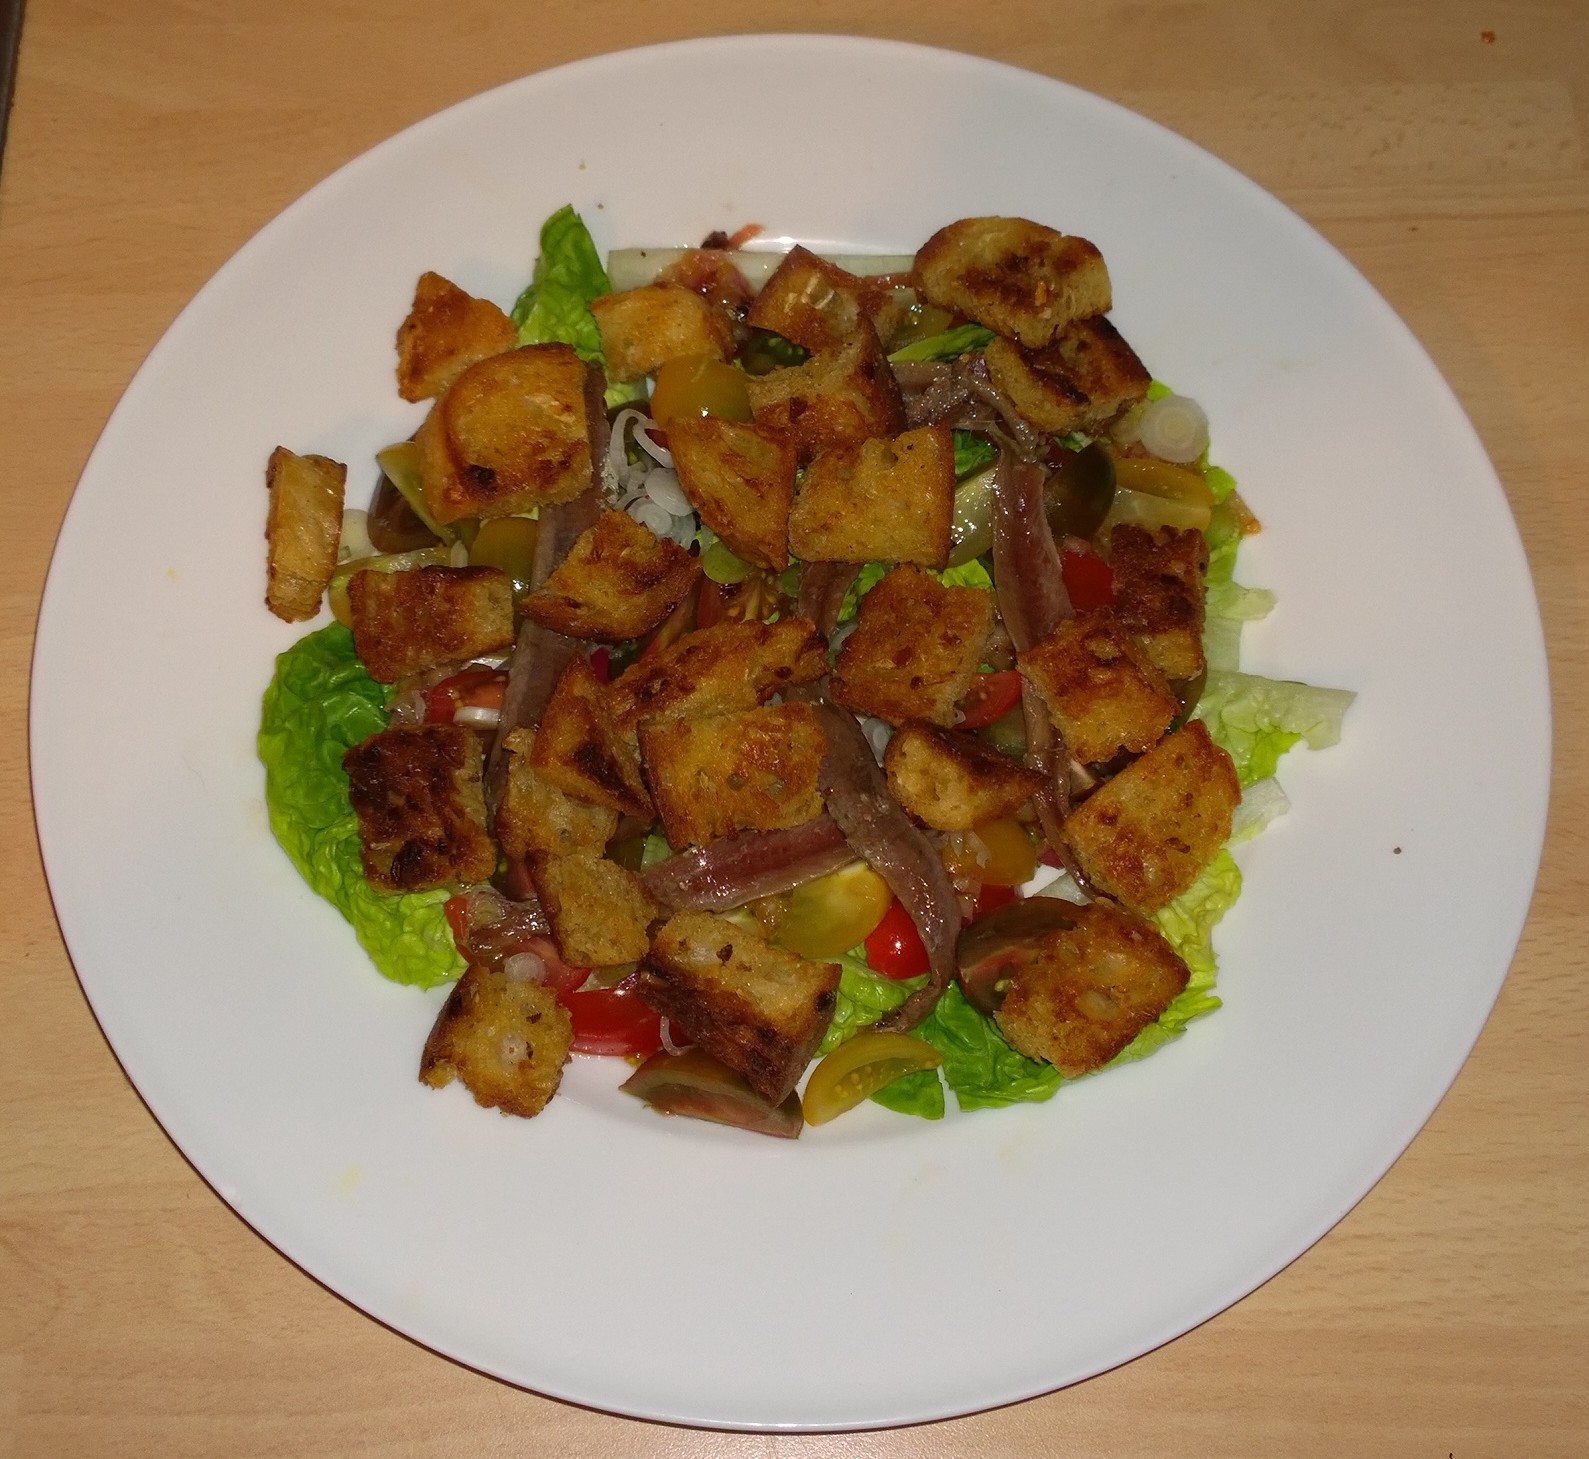
All we have to do now is construct, place some Baby Gem Lettuce on the bottom of your plate, drizzle some of the dressing over the top, then quarter your tomatoes and distribute evenly, finishing with some Anchovies and the rest of the Dressing. Finally, add you ‘Bertinet’ croutons, for me the star of the dish.

My ‘better’ half does not like Anchovies, but loved this dish INCLUDING the Anchovies, the Moscatel dressing is slightly sweeter than normal Vinegars and works really well with the Tomatoes.

A simple dish but stunning to eat with texture and BAGs of flavour, find a Bertinet stockist and have a go. My next blog will be a review of the cookery course I am going on next week.

Till next time, L8ers…………….

Yin & Yang Salad with Spiced Chicken – A European take on a Vietnamese principle

Not long until I am of to Gascony for a weeks worth of cookery lessons, really looking forward to learning some new skills and flavour combinations. My recent venture to the Far East has provided  a much needed boost to the taste buds and got me thinking, how could I bring the concept closer to home. This is something that has been developing in my head for a few weeks, lets take a look.

WP_20140518_13_44_17_ProIf you are casting your eye over the ingredients and thinking ‘oh my god, you must be joking’ believe me, this works. There are some things missing from the picture above, the recipe evolved during the cooking/tasting process. There are several stages to go through, poaching the Pears, making some Caramel, marinating the Chicken etc.  so here goes.

WP_20140518_13_56_39_Pro

Spiced Poached Pears

  • 2 – 4 Firm Pears such as Comice or Conference
  • 1 1/2 Litres Water
  • 1 1/2 Inch piece of Galangal, Sliced
  • 2 Strips Lemon Peel
  • 4 cm piece Cinnamon
  • 4 Star Anise
  • 1 Tbsp Pomegranate Molasses

Place all the Ingredients (except the Pears) into a Saucepan and slowly heat until the sugar has melted, whilst this is happening, peel the Pears and place in the liquid. Doing so at the last minute retains their colour. Make a Cartouche out of greaseproof paper and cut a hole in the centre, this will help keep the Pears in the liquor, but enable some evaporation to take place.

WP_20140518_14_16_41_ProThe picture above shows the technique, let the pears simmer for about 15 minutes and remove from the heat. Let cool and then transfer to a bowl/container and stick in the fridge to chill. (If you want too, make more of these as they make an awesome dessert on their own, served with something crunchy and Cream or Creme Fraiche).

Caramelised Hazelnuts

  • 20 or so Blanched Hazelnuts
  • 200 grms Sugar
  • Cocktail Sticks
  • 1/4 tsp Aleppo Chilli flakes

This element provides some texture and sweetness to the dish. Place the Sugar in a saucepan or non-stick frying pan and place on a high heat, keep an eye on things as you will have to start moving things around gently, but don’t use a spoon. I used the technique HERE, once you have viewed the video a couple of times you should feel confident to have a go, just remember melted Sugar is EXTREMELY HOT!

WP_20140518_15_41_58_ProThis one is almost ready to go, add the Aleppo Chilli at the last minute to prevent it from burning. Next GENTLY insert a cocktail stick into a Hazelnut and with the saucepan at an angle, dip the Nut into the Caramel completely, and then remove twisting the cocktail stick as you go.

WP_20140518_15_54_49_ProNow for the Chicken

  • 1 Chicken Breast/person (The best you can afford)
  • 1 Cup Plain Greek Yoghurt
  • 1 Clove Garlic, crushed
  • 3 sprigs fresh Thyme, stems removed
  • 1/2 tsp Maldon Sea Salt
  • Zest of 1/2 Lemon
  • 1/2 tsp Aleppo Chilli
  • 1/2 tsp ground Coriander
  • 1/2 tsp Sumac
  • 1/4 tsp Cayenne Pepper (My variety from Steenbergs is particularly HOT, you may need more)
  • 3 twists Black Pepper

Mix all the ingredients in a bowl and add the Chicken, making sure its well coated on all sides, cover and stick in the fridge for 2 -3 hours or overnight if possible.

WP_20140518_17_30_32_ProNow for the dressing!

  • 1 Lemon (juiced) + zest
  • 3 tbsp Rapeseed oil
  • 1/4 – 1/2 tsp Rice Wine Vinegar
  • Salt & Pepper to taste

WP_20140518_18_42_42_ProThis dressing needs tasting to get the flavour correct, it should be lemony and sharp, use the Rice Wine Vinegar to adjust the flavour balance. Using Rapeseed Oil gives it a really bright vibrant colour.

THE Yin & Yang Salad

  • 1 Pack Gorgonzola
  • 2 Red Raddichio
  • 2 Pears prepared as above
  • 20 Caramelise Hazelnuts prepared as above
  • 1 serving Lemon dressing prepared as above
  • 2 marinated Chicken Breasts prepared as above
  • 1 – 2 sliced Onions (Used to make  trivet to sit the Chicken on)

Put your over onto its highest heat and let it get to temperature.

WP_20140518_19_36_37_ProGet a baking tray, drizzle some Oil on the base and placed the sliced Onion on top, season with Salt, Pepper and sprinkle some Thyme leaves on top. Place the marinated Chicken on top and stick in the oven. Depending on the size of your Chicken breasts they will take 15 – 20 minutes to cook, plus another 7 minutes resting time.

WP_20140518_20_46_18_ProOur NEFF oven has a barbecue mode, where it alternates between FAN and Grilling Element, if you have this feature then use it for the last 5 minutes of cooking to develop the brown ‘crust’ on the top surface.

All you have to do now is construct the Salad. Separate the Chicory leaves, I cut the base of the stalk bit by bit to ensure there were no chunky ‘ends’, you will see when you have a go yourself. Dress the leaves with the Lemon dressing and place on a plate. Remove the Poached Pears from the fridge and chop into 1 inch pieces spreading amongst the leaves, do the same with the Gorgonzola, then the Hazelnuts, you are trying to balance the quantities to get the Yin & Yang going, Sour (Lemon Dressing), Bitter (Chicory), Sweet (Pears/Hazlenuts), Spicy (Chicken), Salty (Gorgonzola).

WP_20140518_20_57_23_ProSo there you have it, a healthy tasty Yin & Yang dish, bursting with textures and flavours it was delicious. If you are not keen on Gorgonzola, replace it it a Blue Cheese of your choice, for me the quality of the Chicken is EXTREMELY important. Mine comes from Casey Fields farm shop and is pure and natural with nothing injected. You HAVE to try some to realise how poor supermarket Chicken is. My partner was amazed at the texture and moisture in the Chicken, partly due to the sealing effect of the marinade.

Have a go at this, its wowzer.

Till next time,

L8ers……………..


Huevos Rotos or Huevos Estrellados – Depends who is driving!

This quick recipe was inspired by a new book that dropped through the letterbox last week. Morito is a Tapas/Meze restaurant in London’s Exmouth Market, Clerkenwell, and sits next to its bigger family member Moro. Both are owned by Sam and Sam Clark and have books published to match their food inspiration, Morito being the most recent.

WP_20140511_15_57_42_ProA similar recipe is also in Omar Allibhoy’s Tapas Revolution, hence the title of this post, in ‘Morito’ its Broken Eggs, in ‘Tapas Revolution’ it’s Crashed Eggs. This dish won’t take two days to make, but is delicious served with some crusty bread.

WP_20140511_16_10_56_Pro

You can see all the ingredients in the 1st picture, this is enough for 2 people. To start with, peel and cut your potatoes into approximately 1 inch chunks and place in a bowl, we are going to marinade for a couple of hours with a good glug of Olive oil, 2 Garlic gloves, sprigs of Rosemary and Thyme that have been lightly crushed to release their flavours and some Maldon Sea Salt.

WP_20140511_19_25_32_ProAfter a couple of hours we are ready to slice the Onion and Peppers, and gently fry until soft, about 8 – 10 minutes. Different colour peppers seem to cook at different speeds, this adds varying elements of texture and makes the dish even more interesting.

WP_20140511_19_53_00_ProThe next stage is to remove the Peppers from the heat, and in a separate pan, fry the Potatoes gently in Olive Oil until tender and slightly crispy on the outside, while they are cooking you can slice you Chorizo into 1 cm lengths and add them half way through so they can release some of their spicy oil in the potatoes. Then add the Onions and Peppers so they can warm through, we are almost done!

WP_20140511_19_58_21_ProNow for the Rotos or Estrellados moment, break three Eggs into a cup and drop into the mixture from a height, the Yolks should break on impact, remove the pan from the heat and stir gently, you want the residual heat from the mixture to just cook the Eggs. If you think you need to return the pan to the heat for a bit longer then do so, but you want the eggs just cooked and soft.

WP_20140511_20_05_09_ProPut a pile on the middle of a plate, and sprinkle some chopped fresh Parsley, you can finish the dish of with some Salt, if you think its needed and some freshly ground Black Pepper, I also added a couple of Tomato slices and some Rosemary and served with some Bread.

That’s it, a quick a tasty simple dish that full of flavour and really simple to cook.

Enjoy…….

Till next time, L8ers.


Rượu táo om má thịt lợn phong cách Việt – Cider Braised Pork Cheeks Vietnamese Style

Back to to the Far East and a new recipe that evolved as I was driving back from Casey Fields farm Shop! This one is most definitely my own and came about as I was looking for a different spin on braised Pork Cheeks, read on to find out about a new addition to my repertoire.WP_20140506_17_24_59_ProThe last time I cooked Pork Cheeks I prepared Carrilleras Estofadas, a Spanish Braised dish, rich with Red Wine, Beef Stock, Tomatoes and Carrots, ideal for Autumn and Winter, but not necessarily a Spring or Summer Dish. Wanting to develop something lighter, I looked to the Far East for further inspiration and thought about what goes with Pork…………CIDER!

For this little beauty you will need the following ingredients, as with the last couple of recipes, you will need to adjust some of the flavours by taste, to get the right balance.

Cider braised pork cheeks Vietnamese Style (for 2 people)

  • 4-6 Pork Cheeks
  • 2 Inch length of Galangal, sliced
  • 1 Lemongrass stalk, bashed with a rolling pin and cut in half widthways
  • 1 Tbls Coriander Seeds
  • 2 Cloves Garlic chopped roughly
  • 3 Kaffir Lime leaves
  • 2 Red Thai Chillis (Leave Whole)
  • 1 Green Thai Chilli (Leave Whole)
  • 3 – 4 Shallots, roughly chopped
  • 4 Star Anise
  • 1 Tbls Rice Wine Vinegar
  • 1 Tbls Nam Pla (Fish Sauce)
  • 1 Tbls Light Soy Sauce
  • 1 1/2 Tbls Palm Sugar
  • 500 ml Chicken Stock
  • 300 ml Tutts Clump Special Reserve Cider (if you can’t get Tutts Clump, then a DECENT dry – medium cider)
  • 2 Servings Plain White Rice
  • 1 Bunch Coriander
  • 2 Pak Choi (quartered)
  • 1 Tbls Sesame Seeds
  • 8 – 10 Drops Sesame Oil
  • Plain Flour, Sea Salt & Pepper to Coat Cheeks/Season
  • Cornflour/Water (Slurry)

WP_20140506_17_31_04_ProThe first step is to put some flour and liberal amounts of Maldon Sea Salt and Pepper in a dish, and coat your Pork Cheeks, then fry them off in some Ground Nut or Vegetable Oil until brown and sealed, set aside on a plate whilst you make the braising liquor. Set your oven to 140 deg (fan) 160 deg (convection) next, this baby is going to slow cook for at least 2 1/2 hours.

WP_20140506_17_41_09_ProPut some Oil into a Dutch Oven or suitable casserole and gentle fry the Shallots, Galangal, Chillis, Garlic, Star Anise, Lemongrass and Coriander Seed until the aromas start filling the kitchen, then place the Pork Cheeks on top, and add the Chicken Stock, Cider, Rice Wine Vinegar, Nam Pla, Palm Sugar and Kaffir Lime Leaves and gentle stir to dissolve the Palm Sugar.  You then need to make a CARTOUCHE, a scrunched up piece of greaseproof paper that you put on top of the meat/liquor pressing down gently so it touches the surface of the liquid, acting like a close fitting lid. Put the lid on top and place into the oven and set the timer for 2 1/2 hours.

WP_20140506_20_04_21_ProFingers crossed, when the timer pings, you should have something that looks like the above, the brown line around the surface of the liquid is where the cartouche was sitting during the cooking process. Remove the Pork Cheeks gently from the liquor, they should be very tender and could fall apart, put them in a dish, cover with foil and put back into the oven, turning the temperature down to under 100 degs, you just want to keep them warm. Strain the liquor into a saucepan and put onto a high heat to reduce for 5 minutes, in the meantime make a Slurry from 50/50 Corn Flour and Water about 2 Tsps worth and add, stirring continuously until the liquor starts to thicken, it should stick to the back of a spoon.

Turn the temperature down to low, we are nearly ready to finish the dish. For speed, I used quick cook Rice, which only takes 90 seconds in the Microwave (Gasp, oh no, surely not….Its quick!). The Pork Cheeks are to be served with Plain Rice, that has chopped Coriander mixed through it, and Pak Choy, with Sesame Seeds & Sesame Oil, really easy to do.

WP_20140506_20_19_21_ProTake a frying pan with a lid, add some Oil on a medium heat and put in your Sesame Seeds to cook for 30 seconds, add the Pak Choy which has been quartered, add a little water to create some steam and put the lid on quickly. I cooked mine for about 2 minutes maximum, remove the lid and CAREFULLY add about 10 drops of Sesame Oil all over the Pak Choy and gentle turn to mix, that’s it done!

WP_20140506_20_20_48_ProSo all there is to do now is plate up, nappe the thickened sauce over the Pork Cheeks and serve with the Rice and Coriander mix. The great thing about this dish is the fact that it is very light, very fragrant, and does not have the fiery kick of other dishes I have recently posted, so suitable for younger mouths if you want to introduce them to unusual cuisines.

WP_20140506_20_26_08_ProIf you want it spicier, then rather than adding whole Thai Chillis, chop them up to release the heat, you can play with the balance of Sour, Bitter, Sweet, Spicy & Salty, the Ying and Yang of Vietnamese cuisine by adjusting the quantities of Fish Sauce, Soy & Rice Wine Vinegar, the Pak Choy adds a slightly bitter iron dimension and some crunchy texture if you don’t over cook it.

Hope you have a go, it was great fun thinking this one up, cooking it, and finding another way to enjoy my local Tutts Clump Cider.

Until next time,

L8ers……………………………..

Thơm cay salad gà Với Mì – Vietnamese Fragrant Spicy Chicken Salad with Noodles

Another mind trip to the Far East, in this case Vietnam has inspired me to look for some more healthy, fresh and taste bud exploding  food.  Trawling through Rick Steins ‘French Odyssey’, and Uyen Luu’s ‘My Vietnamese Kitchen’ produced a couple of interesting recipes, this is my adaption and interpretation of them both. France had a massive influence on Vietnam, it was a part of the French Colonial Empire until 1954, when Viet Minh (league for the independence of Vietnam) won a decisive victory against French forces at the gruelling Battle of Dien Bien Phu.

WP_20140503_15_47_31_ProFor this lip smacking recipe you are going to need a few ingredients, there are 3 stages to make this work. Buy THE BEST chicken you can afford, I chose two supremes from our local awesome farm shop Casey Fields, its not injected with anything so has great TEXTURE, unlike the stuff in supermarkets, its makes a difference in this dish, due to the very texture.

Poaching Liquor

  • 1 1/2 inches of Galangal or Ginger if you can’t get it
  • 1 Stalk Lemongrass, bashed with a rolling pin and halved widthways
  • 3 Star Anise
  • 4 Kaffir Lime Leaves
  • 1 Shallot, quartered
  • 1 Red Thai Chilli
  • 1 Green Thai Chilli
  • 1 Garlic Clove, quartered
  • 1 1/2 Litres water

Chuck all the poaching ingredients and water into a saucepan, bring to a boil and place the Chicken in the liquor, allowing to simmer gentle for 8 – 10 minutes lid on, then take off the heat and let cool right down which can take 2 – 3 hours. This ensures the Chicken is cooked, but remains moist and soaks up the flavours. You are going to use the liquor again, so DON’T throw it away!!

WP_20140503_16_01_44_ProThe next stage is to prepare the sauce, this imparts the Sour, Bitter, Sweet, Spicy, Salty which is typical of Vietnamese Cuisine, this is the balance of 5 elements, spicy (metal), sour (wood), bitter (fire), salty (water) and sweet (Earth), corresponding to: five organs the gall bladder, small intestine, large intestine, stomach, and urinary bladder. Its all about the Yin Yang balance and you can find more about is HERE.

WP_20140503_16_46_44_ProTHE Sauce

  • 4 Tbls Fish Sauce (Nam Pla)
  • 2 Tbls Rice Wine Vinegar
  • 1 Fresh Lime (juiced)
  • 2 Tbls Palm  Sugar
  • 1/2 – 1 Garlic Clove very finely sliced
  • 2 Finely Sliced Thai Red Chilli’s
  • 1 Slivered Thai Green Chilli (add when finished as a colour balance)
  • 1 Halved and Sliced Shallot
  • 1/2 – 1 Tsp Corn Flour mixed with a little water

ALL +/- to taste.

Place all the ingredients in a small saucepan except the Corn Flour and heat until the Palm Sugar has melted into the sauce, then TASTE TASTE TASTE, you are looking to strike a balance between each of the elements, your palate will tell you what you need to add more off, in my case I needed more Lime Juice and more Palm Sugar, but keep adjusting CAREFULLY until its tastes right for you. When you are happy with the flavour and the sauce is hot (temperature wise!), thicken with some Corn Flour and Water, you are looking for a ‘gloomy’ slightly thickened texture that would coat the back of a spoon and stick. Finally, add the slivered Green Thai Chilli and set aside to cool.

WP_20140503_17_05_36_ProWe are almost ready now, and just a couple of stages to go….. Sorry my food is not that often as simple as opening a can of beans!

We need to add some texture elements to the dish, which come in the form of Roasted and Salted Peanuts and Hoe Fun Rice Stick Noodles. I used raw peanuts, removed their skins by rubbing between fingers (a but laborious, but kind of relaxing), and then placing them in a hot frying pan with a SMALL amount of oil and sprinkled with sea salt cooking until they change colour from Pale blond, to light brown.

WP_20140503_18_45_43_ProHoe Fun Rice Stick Noodles are made from Rice Flour and Water, and readily available, similar to Vermicelli Noodles, just thicker and flat in shape. We are going to cook them two ways, the first requires a handful to be soaked in cold water for 15 minutes, this will soften them, but not noticeable. Remember the poaching liquor for the Chicken, well take the Chicken out and place the Liquor into a saucepan and bring to the boil. Plunge the Noodles in the boiling liquor for no MORE than 1 Minute, then remove, strain and sprinkle 4 – 5 DRIPS of Sesame Seed Oil to lubricate and prevent them from sticking together too much. Be CAUTIOUS with the Sesame Oil, its very pungent and its supposed to be a background flavour in this dish, too much and Yuch, so its no more than about 4 – 5 drops and mix in with the cooked Noodles, you have been warned.WP_20140503_19_12_12_ProFor the Salad you will need the following ingredients

THE Salad

  • 1 Chicken Breast/Supreme per person (Poached as above and left to cool)
  • 1 Handfull Roasted Salted Peanuts per person (cooked as above)
  • 1 Half Cucumber, Seeds removed per 2 people (so 1/4 lengthways), thinly sliced
  • 2 Spring Onions per person, cut at the angle
  • 1 Handful Bean Sprouts per person
  • 1 Handful Hoe Fun Rice Stick Noodles (cooked as above)
  • 2 Tbls Sesame Seeds, toasted in a frying pan
  • 5 Mint Leaves Chiffonade per person
  • 1/2 Bunch Coriander thinly chopped per person
  • 1 Handful Hoe Fun Rice Noodles (Deep Fry them at 190 Degrees and they puff up and go crispy, drain on kitchen paper)
  • 10 Muntok White Peppercorns, freshly ground (pestle & mortar if you have one), and sprinkled over at the last minute

WP_20140503_19_21_59_ProYou can see most of the Ingredients in the picture above. Firstly take the Chicken, pull it apart into thin strips and place on a plate, drizzle some of the dressing over the Chicken and then add the thinly Sliced Cucumber and Spring Onion. Drizzle some more dressing and then the Chiffonade of Mint, it should look something like this.

WP_20140503_19_34_50_ProNext job is to Spread over the Bean Sprout’s, Coriander, Peanuts, Sesame Seeds and the rest of the Sauce, take the handful of Rice Noodles straight from the packet and put into the fryer, they will cook in seconds, puffing up buzzing. Drain on Kitchen paper, sprinkle with some Sea Salt and place on top of the Salad. The last step is to season with WHITE pepper, I use Muntok Pepper from Steenbergs, freshly ground in a pestle and mortar seconds before serving, its adds another flavour dimension and really adds to the dish, adding a hot slightly Bitter element, so important in Vietnamese Cuisine.

WP_20140503_19_41_46_ProSo there you have it, Vietnamese Fragrant Spicy Chicken Salad with Noodles, it is a seriously tasty dish, takes a bit of effort but well worth it. Be warned though, it is quite spicy, not quite as much as the Weeping Tiger Salad I published recently but could still bring tears to your eyes so if you prefer it slightly milder, less Chilli.

My next feature is going to be a braised Pork Cheek dish I have been working on, Far Eastern influences but the main flavour profile  is Tutts Clump Cider, should be on the blog later this week.

Enjoy,

L8ers…………..