 The continuing saga of dessert development goes on! The 1st bash had gone ok, but there is much work to do to get things to the point I would be happy, and make a completed version of Pistachio Dacquoise, Roasted Pineapple Jelly, Kerisik Mousse and Chocolate Glaze, for friends to try.
From the last session, I had been considering how to notch things up a bit so looking through the various components, Dacquoise, Mousse etc. I decided to focus on the Pineapple and see if I could improve things, so how do you make Pineapple special? The 1st version used Pineapple that had been roasted with some sugar in the oven, it was ok but quite sharp. I could add more sugar, like Muscovado to add more depth but decided I would try something new and make a ‘Spiced Caramel‘ to roast the Pineapple in, never done that before. Adding 2 parts Sugar to 1 part water and slowly bringing to the boil you can start to smell the Caramel aroma fill the kitchen. Looking through various books and posts there are loads of methods published explaining not to stir the mixture as its creates crystals and wiping the sides if the pot with a wet brush to ensure all the sugar is dissolved.
 The spicing would come from a range of aromats, added once the Caramel is made and cooled a bit to prevent burning the spices, the sugar mixture is EXTREMELY HOT. The Sugar/Water mixture started to boil rapidly and change colour from White, to Tan to Brown, job done.
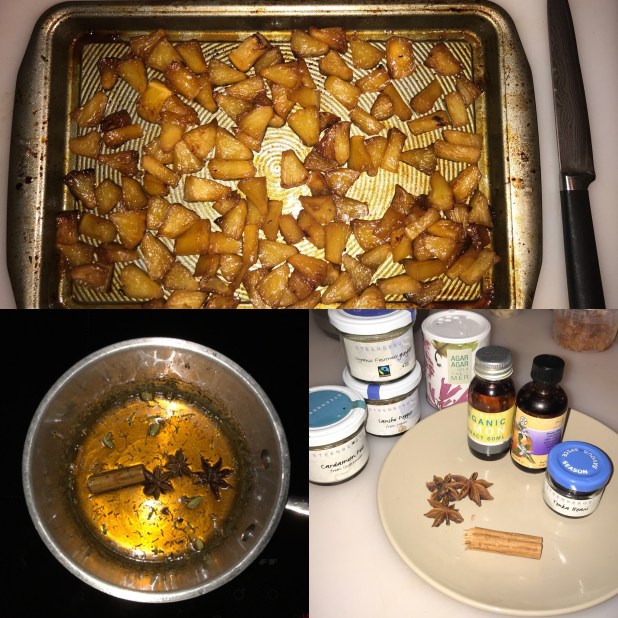
 I source my herbs and spices from Steenbergs, my favourite supplier and they were to feature heavily in the added flavours. Organic Lemon and Orange Oil, Cinnamon, Cardamon, Star Anise, Sanscho Pepper (from Japan) and grated Tonka Bean. I did not use the Ginger as shown in the picture above in the end, I might try some fresh Ginger next time round.
 I let the Caramel cool for quite a while and then added the spices as you can see above, I used about 1/2 a grated Tonka Bean, the flavour is similar to Vanilla but subtly different, buy some to see what I mean. The Japanese Pepper adds a delicious bite to the Pineapple and an extra edge!
 I used two fresh Pineapples, removed the core and skin and cut into rough chunks as above. The oven was set to 180 deg, I poured the caramel over the apples and mixed well, removing the spices with a sieve beforehand and set the timer to 2 hours. I checked the Apples every 30 minutes and gave then a good mix up to make sure the Caramel was coating them well.
 It was noticeable that the moisture from the Pineapple had ‘diluted’ the Caramel so unlike last time, the cooking was extended to about 2 hours and 20 minutes, you can see the results above. I think in hindsight I could have taken the Caramel to a much deeper colour in the first stage to make it even richer but thats the point of experimentation in the kitchen.
 I didn’t go through the jelly stage this time round, we had the Pineapple warmed through with some clotted cream and it was really very tasty. Learnings for next time are:
- Take the Caramel much further to a deeper colour
- Let the spices steep for even longer to allow the flavours to infuse even more
Next time I will be focussing on getting the Pistachio Dacquoise into better shape, and then looking at the Kerisik Mousse but all this will be when I am back from Malaysia, a trip I am extremely excited about.
In the last few weeks I have had to spend some overnight time in London, and been lucky enough to try out a couple of new restaurants, Vanilla Black and Oklava, both at different ends of the foodie spectrum so here was my experience at both.
A Night at Vanilla Black!
 Lets start by saying I am NOT a vegetarian, but Vanilla Black IS a Vegetarian and Vegan establishment situated in Tooks Court near Chancery Lane in London.
So why the hell did I, a meat eating carnivore who loves the finer side of Ox Cheek, Jacobs Ladder, Liver, Heart and who knows what else decide to pay very good money to try this ‘vegetarian’ place out? Because the food looked AMAZING, and other reviews had suggested this was not your run-of-the-mill place to eat Nut Roast, Stuffed Peppers, Vegetarian Lasagne and all the other variations of meat dishes, with the traditional protein replaced by ingredients like Quinoa, Cous Cous, Haloumi or other products that could be used in more imaginative ways, just like Yotam Ottolenghi is pretty damn good at!
So I sat at my table, a little earlier than planned as my 30 minute walk turned out to be only 15 minutes and perused the menu. I had already chosen to be honest, I was going for the Vegetarian Tasting menu with matching wine flight, might as well do things properly. The restaurant was already pretty full and buzzing, most of the eateries I has passed on the way were either empty or only had a very small clientele, a good sign I thought. I was presented with a glass of bubbles shortly after arrival which was a nice surprise, and some home made bread and butter to nibble on to get things going. The 1st of 2 amuse bouche was a delightful mouth cleanser as my waitress explained, a Carbonated Apple drink with small pieces of Celery and a dusting of Parsley powder it certainly did the trick, refreshing with some lovely texture it set me up for what was to come.
 Hmm, here we go, course number 1: Cucumber, Sticky Rice and Ginger Purée, Pickled Cucumber Ketchup and Seaweed, what the hell was going on in my mouth, it was just stunning. When you read the ingredients and think, sounds a bit, you know…The Sticky Rice was surrounded in a crumb so you got oodles of texture, all the other flavours just danced around, it was very good indeed, the ginger doing a really good job of reminding you it was ever present. The wine that accompanied this dish the waitress explained was a Hattingly Sparkling Wine which really worked very well with the various flavours.
 So onto dish no.2: Baby Fennel, Creamed Lemon and Toast, Fennel Purée and Ice, Basil and Lime, served with a Tempranillo Blanc. I was writing notes in between each course on my iPhone, to remind me what I was tasting. I particularly remember this dish as the contrasts between the temperatures were a real hit, quite magical on the palate.
 Things were getting interesting, if not already exceeding all my expectations. The service from the young Hungarian waitress was impeccable, taking time to explain each course, and why the particular wine matched. I asked for a list of the wines as I had not taken detailed notes and she arrived back with a piece of paper with them all written down for me, she was very passionate about the food being served.
Annoyingly, I was so wrapped up in the ‘vegetarian’ experience I forgot to capture the 2nd Amuse Bouche which was based on Buratta, I’ve had the pleasure of a private trip to an artisan cheese producer in Puglia and tasted it fresh along with Mozzarella and Ricotta, still warm from the production process it’s fabulous.
So dish no.3? Tomato Shortbread, Sheep’s Milk and Brocoli, Gem Lettuce and Egg Yolk, served with a Sancerre. This was frustratingly good, warm Shortbread, sorry no, Tomato Shortbread it was warm and delish with the Sheeps Milk Centre (Cheese of course), again with different texture and flavours bouncing all over the place. It was all going very well, nothing to get the slightest bit ‘oh, not sure about that’, and before too long it was course no.4: Baked High Cross and Charred Spring Onions, Roasted Onion Purée served with a Rioja Promesa, very nice too. The only ‘minor’ challenge with this dish was the Spring Onions which were slightly stringy, but otherwise another amazing piece of food engineering.
 Unfortunately it was time for dessert, and I am Type 1 diabetic, but on occasions and this was to be one of the them (two actually, more in a moment) I thew caution to the wind as the Cep Mushroom Fudge, Roasted Cocoa and Honey Ice Cream, Salted Lavender Honeycomb and Brioche landed in front of me, complete with a Tokaji Dessert wine. Bugger, it was so so so delicious, I could argue at least one of my five a day was on the plate. Cep Mushroom Fudge WTF!! Just Brilliant, the sweet wine a perfect match that was me done for the evening, or that’s what I thought!
 Next thing I knew I was presented with another dessert, this one from the Vegan menu! Coconut Sorbet, Toasted Rice Mousse and Coffee Coconut Crumble and Coffee Sponge, thank-you Chef a really nice touch it was another stunner, but for me the Cep Mushroom Fudge is definitely the winner on this occasion.
So, I guess you can tell I am now a Vegetarian! No, not quite but the evening at Vanilla Black was beyond outstanding, why, because it was Vegetarian and everything I was served was amazing (spring onions excused), I went in with an open mind and came out astounded at how they could produce some of the best plates of food I have ever eaten, so thank-you Andrew, and your brilliant team.
If you fancy trying something a little different and prepared to have your mind messed with, I whole heartedly recommend the tasting menu for a whole new experience, it was awesome.
Now on to Oklava!
 Selim Kiazim was on Saturday Kitchen this morning on BBC1, she is a fantastic Chef and I was lucky enough to get a place at her restaurant Oklava a few weeks back, with a book recently published of the same name it sits proudly on my shelf nestled amongst Yotam Ottolenghi, Sabrina Ghayour and Bethany Kehdy, to name a few middle eastern favourites.
Turkish Cypriot food is on the menu, with the option of a table or sitting at the ‘pass’ watching the food being prepared it’s a very warm and open environment.
This was my second night in London, and after Vanilla Black, was looking for something different, and Oklava hit the mark. I managed to get a booking the day before and also managed to arrive 45 mins early this time, the underground was running very well and walking distances on my side had been completely over estimated. The place was buzzing just like the previous evening which again bode well for a great night to come.
This evenings menu included meat and fish too but strangely, I did opt for a Vegetarian option for one of the courses, more of that in a moment.
 I was given the option of sitting at the end of the bar and had a fantastic view of all that was going on, which was really great. Seeing Selim and her all female team in action was really interesting as the orders were placed, and the food prepared in front of me, the open fronted oven in the background used for roasting various menu items.
There is a nice menu selection which should cover most tastes, mine was to start with the Spiced Chicken Parfait, Cracker and Pickled Apricots which I watched being prepared before me.
Really very nice indeed the Parfait was very smooth and packed full of flavour, the spicing tickling the tastebuds enough to say ‘hello, i’m here’! The home made cracker was an interesting addition, replacing the usual heavy bread which can fill you up too much before a main course. I was being looked after by a lovely American lass, who had arrived in the UK about 3 months previously and certainly knew the menu well, making recommendations and suggestions as to what would work. To go with the food i picked a Turkish Wine from Northern Anatolia, Diren Collection 2015 which is made from a grape i had not heard of, Narince which was very tasty.
My next dish was a bit unusual, in that it was that ‘vegetarian’ feeling taking over me again, Chilli Roast Cauliflower, Red Onion, Parsley and Pistachios was ordered and arrived after getting the roasting treatment from the open oven. It’s in Selim’s book, also called Oklava so i am looking forward to having a go in the future myself. I reckon it could stand up as a main course all on it’s own with maybe some salad as a side. It was very rich and packed full of flavour, i am glad i picked a lighter main course. For the main even i went for Lahmacun, something i have wanted to try since seeing Rick Stein munch through one on his series Mediterranean Escapes in 2010! Spicy lamb mince on a home made wood fired flat bread, topped with a zesty salad and lemon juice then rolled and eaten it was very very nice indeed.
No dessert for me that evening as the night before had taken my quota for the month, it was a great evening with lovely food, the service was very good, attentive and unfussy Oklava deserves the positive accolades it receives, highly recommended and one to return too in the future.
Selim kindly signed a menu for me to take home during service to keep with the Oklava book I proudly own.
……………………………………….Until nest time…………………….L8ers………………………….

 Having recently attended a Chocolate School with the very talented Mark Tilling, I was encouraged to ‘stretch’ myself a little bit and broaden my skills beyond making a properly tempered bar of Chocolate!
 As my regular readers will know, I was diagnosed with Type I Diabetes last year so I have made subtle changes to my diet, no Sugar in Tea is the main one, and Desserts are an occasional treat, which to be honest is the way it has always been, I don’t have a really sweet tooth. So I was looking to stretch myself again and decided to have a go at a ‘Dome’ cake, they look a bit challenging and having tried one of William Curley’s from his Boutique in Richmond a while back, if I was 50% as good it would be a result.
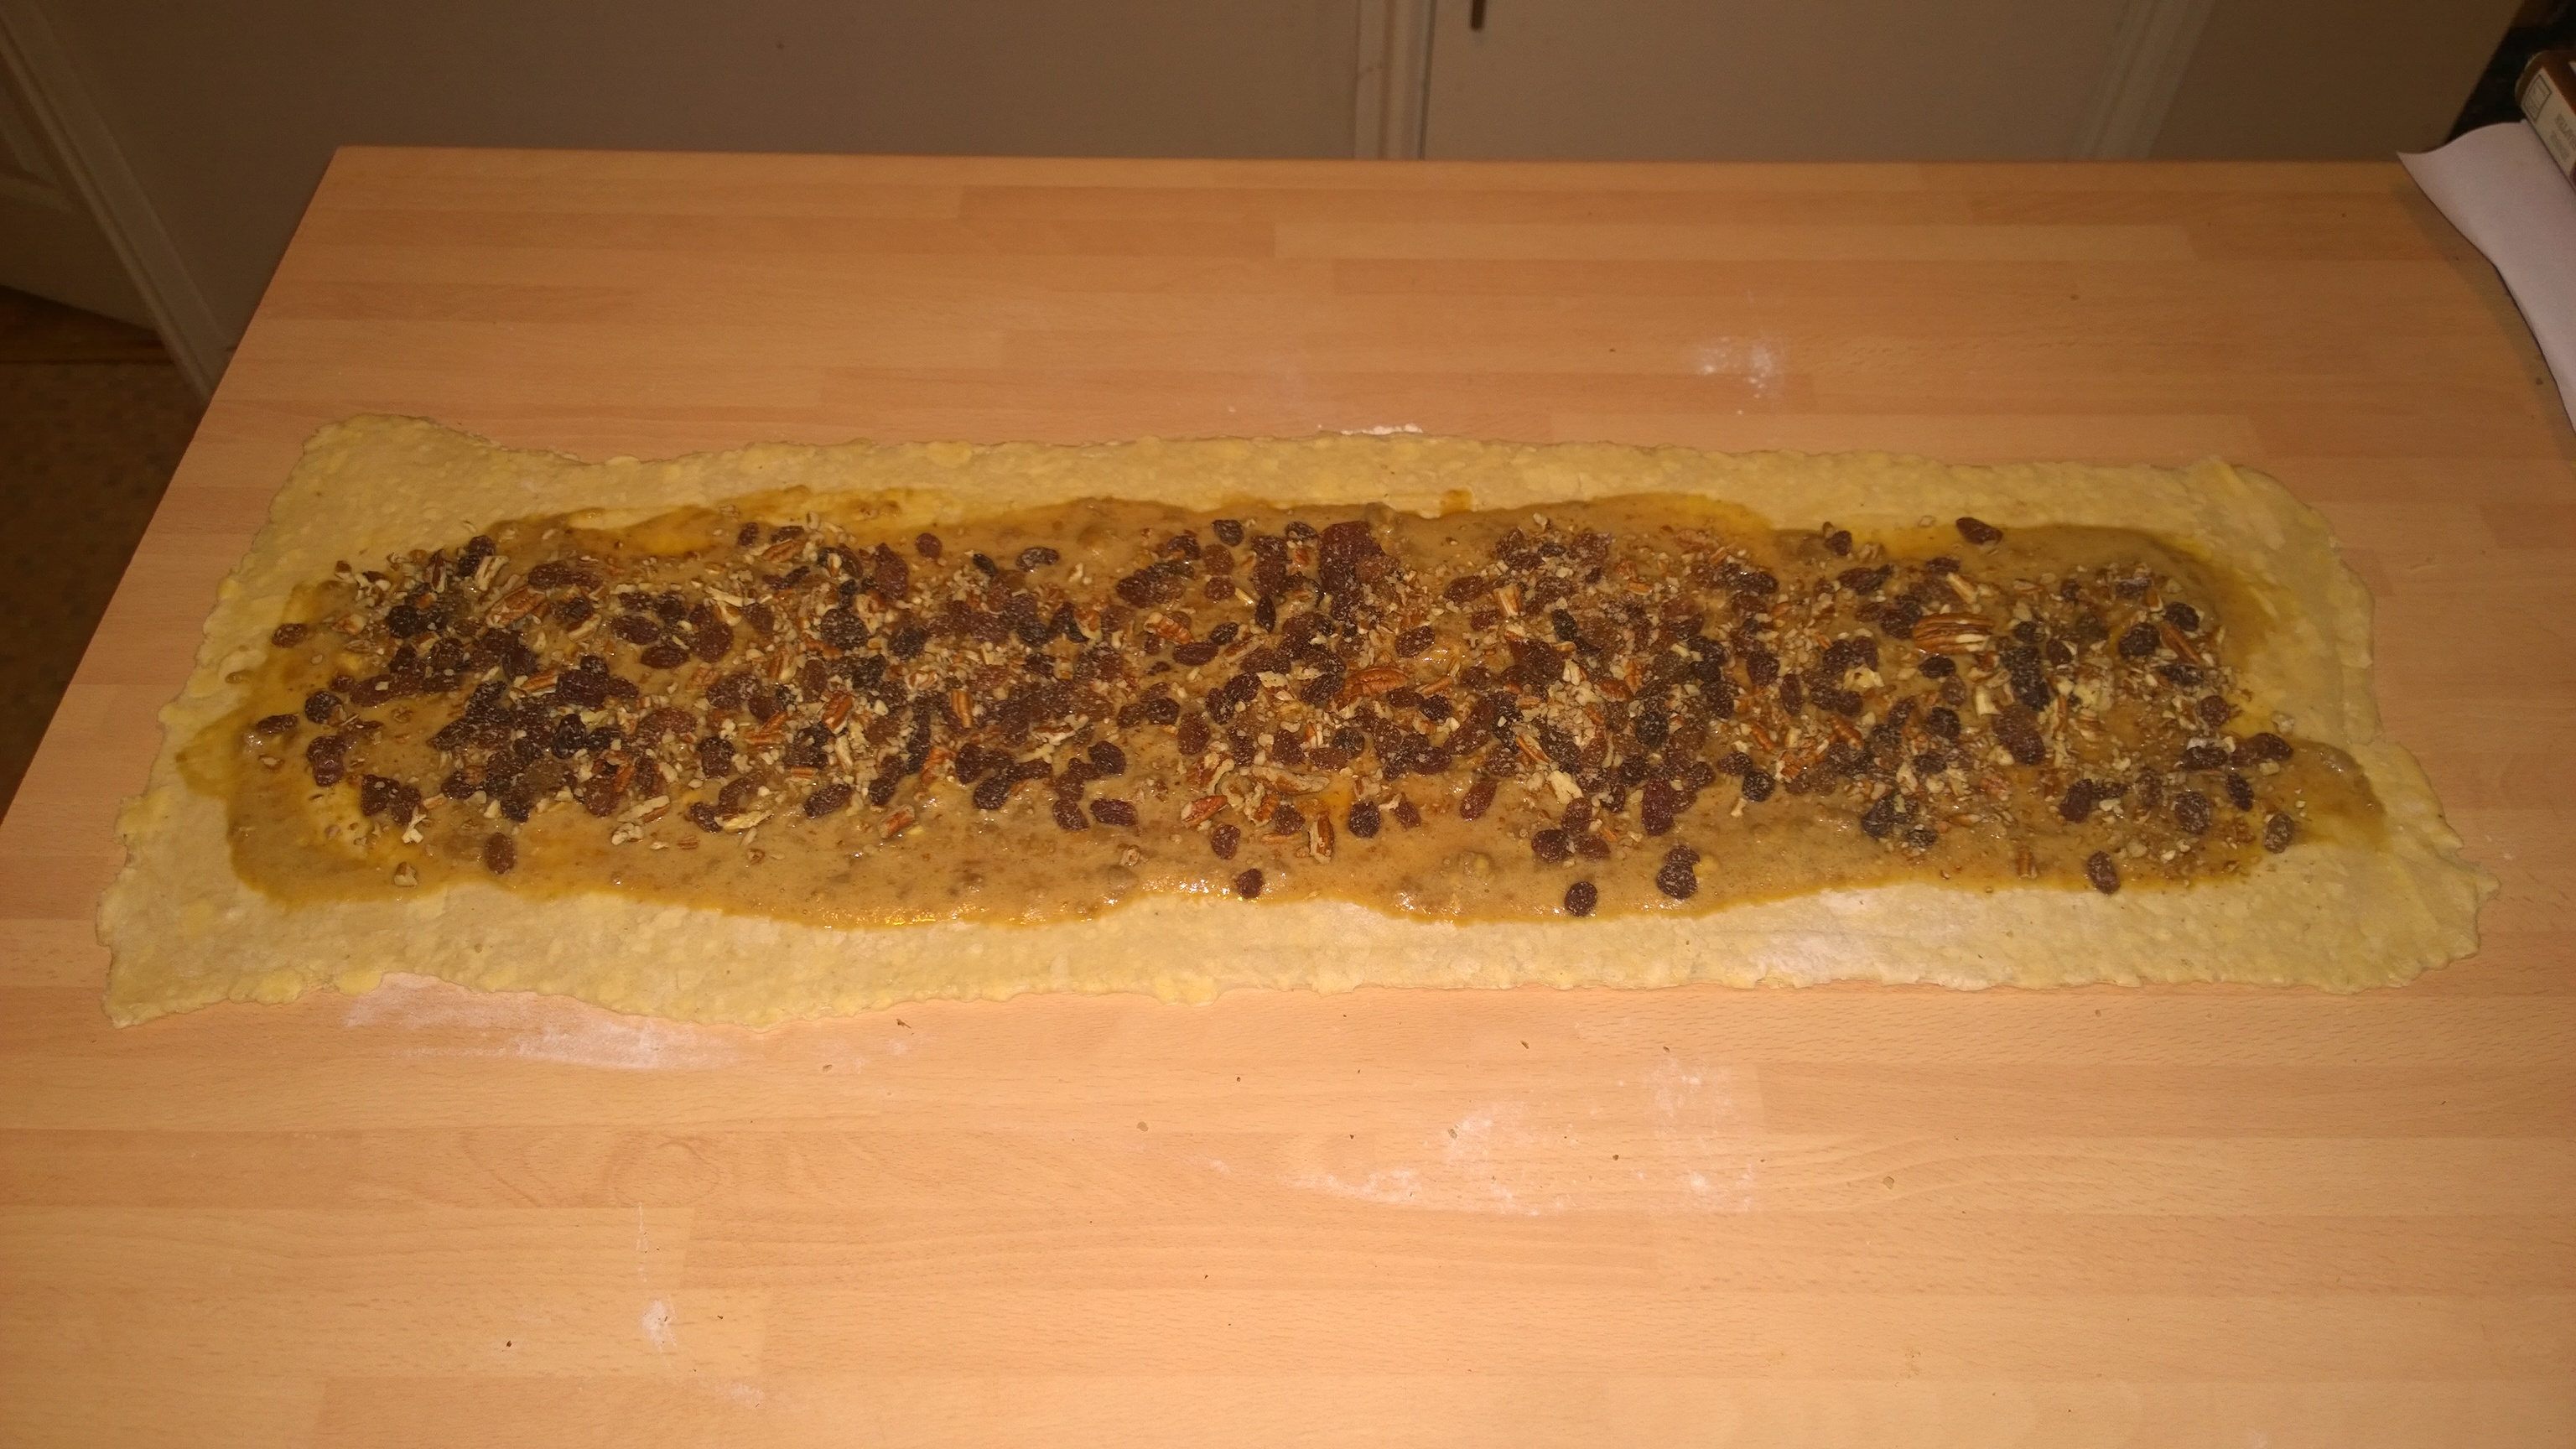
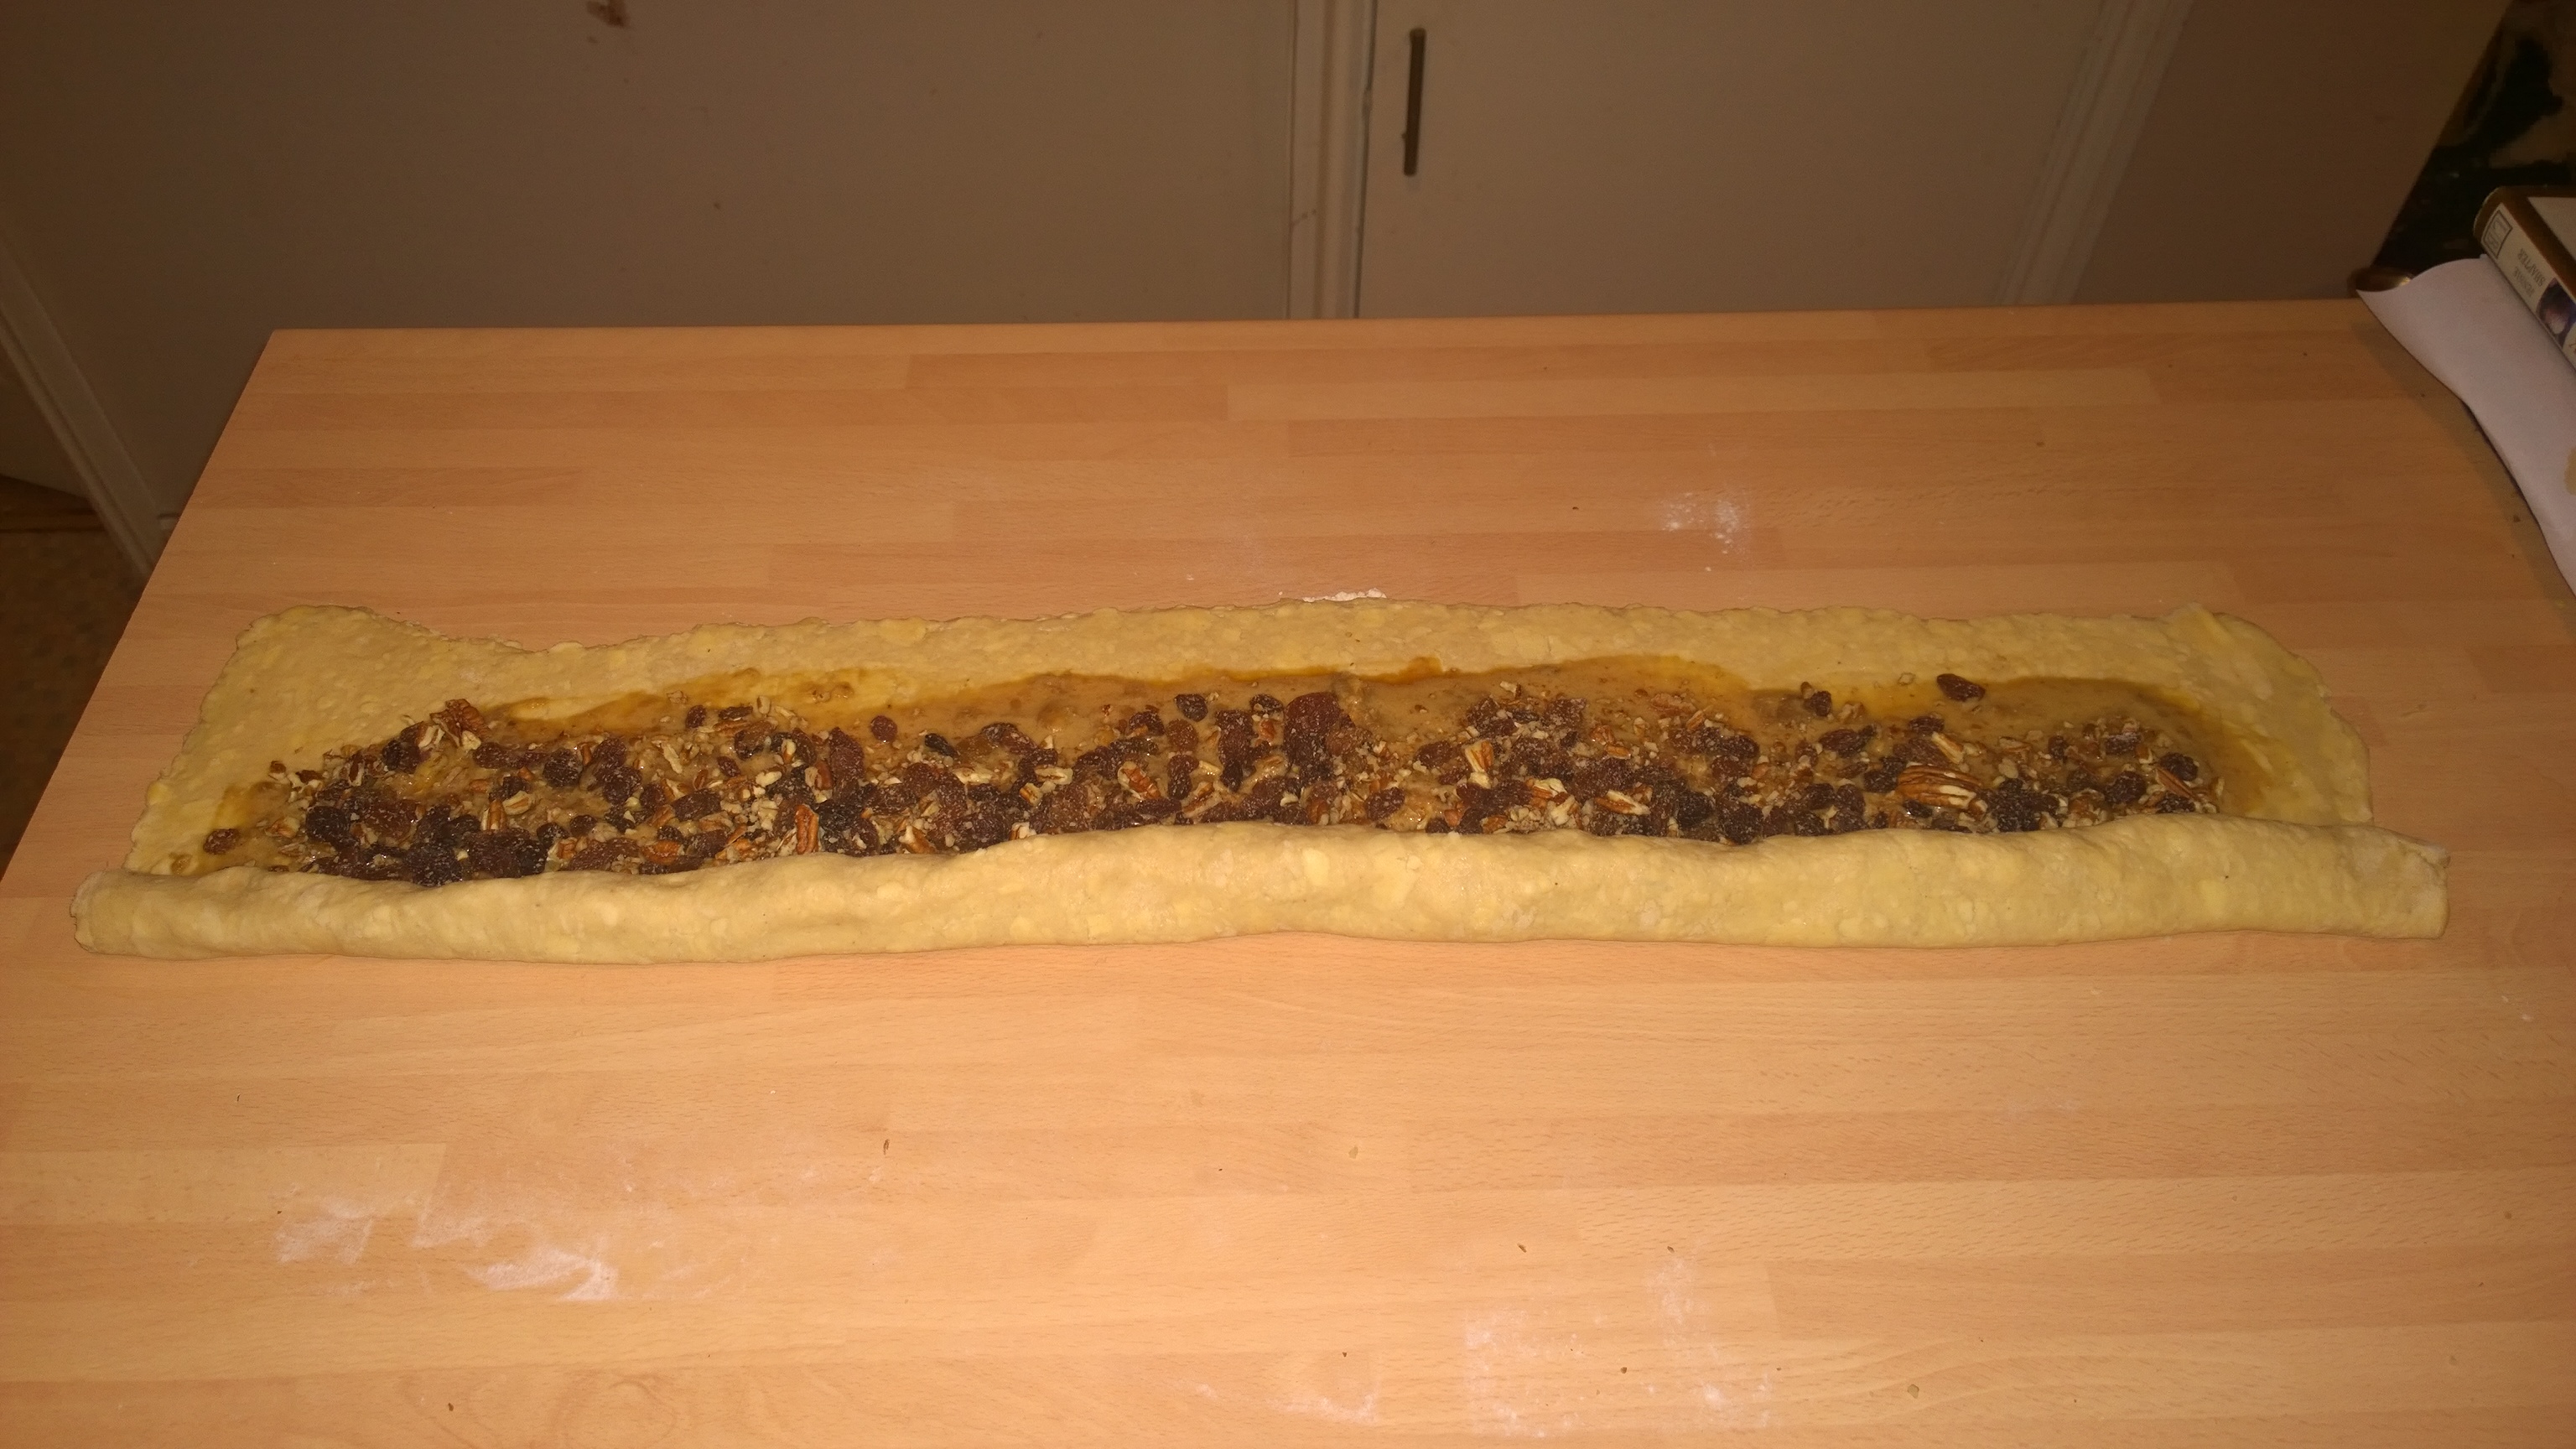
 If you have warm hands I would wash them under cold water, we want to grate all the Butter into the Flour which has been sieved with the Baking Powder and Sugar. Do it in stages so you can lift the flour with your hands and coats the butter so they become like breadcrumbs, as in the picture. Someone in the house had used the Brittany Salted Butter I had planned to include so had a ‘lightly’ Salted Butter and just added a little extra.
 Stick it into the fridge wrapped in clingfilm overnight, or for at least 4 hours. You can then gently roll it to a thickness of 3-4mm and cut with a 6mm round cutter and place on a lined baking tray. This is where I made my 1st mistake, it needs to go back into the fridge to firm up and I used a fluted cutter that was slightly bigger.
 We need to cook the Mango after it has been peeled and sliced. Mine took about 40 minutes on a low heat, I added a dash of Water half way through to stop the Mango sticking and burning on the base. We do this because Mango is quite fibrous and we want to break it down as much as possible. Brûlée’s should be smooth and silky so we will be sieving the final product anyway, but it’s worth going through this stage to get a much flavour as possible.
 Once the Mango is cooked it needs some serious blitzing. We have a ‘Ninja’ which made the Mango into a puree in no time at all. Brûlée means burnt or scorched Cream so we have to heat the Cream, Mango and Sugar up to a point that it has just boiled and started to rise up the sides of the pan, then take it off the heat.
 Then, pop in the fridge to set. After an hour or two, pop into the Freezer, we need them frozen to get their White Chocolate and Lime coating before going into the Coconut Mousse.
 These are the Sable Bréton after 18 mins at 180 degrees, golden and delicious they need to cool right down and go into an air tight tin as we won’t need them for a day or so.
 So we have our Frozen Brûlée. You could miss this next step but I wanted to add another textural component into the dish along with a subtle surprise of citrus in the form of Lime.
 The tempering process used provides the textural ‘snap’ that would not happen if you just ‘melted and poured’. Traditionally quite complex tempering has been simplified by the use of something called MyCryo, which is readily available online and is in reality powdered Cocoa Butter.
 As you can see from the notes above, for White Chocolate we need to heat to 40-45 degrees, err on caution and keep to the lower end. Use a Metal bowl over hot water, a Digital Thermometer is needed to do this properly, again easily available online for a few pounds.
 The Gelatin Sheets I used from Sous Chef are 23cm x 7 cm and weigh 2.5 grms (approx). Each sheet can set 100ml of fluid into a soft texture, but are affected by milk products, sugar (sets firmer) and alcohol (too strong sets looser).
 The Dome Cakes need a glaze, a shiny coating to finish them off. I looked at several, White Chocolate, Milk Chocolate, Cocoa based but opted for a recipe in
  Let’s sort out the Sablé Breton next. Take a good handful of Pistachio Nuts and blitz them in a blender, not too fine as we want a bit of texture. I use Pistachios a lot, in Middle Eastern Cooking and find the ones in the shops are ‘ok’ but usually have a brown skin which will not look (or taste) nice. They are also quite expensive so I made an investment and purchased a Kilo of skinned Iranian Pistachios as in the picture above, again from Sous Chef who are a very good online supplier.
 This bit was challenging as I had never done it before. The glaze needs to be at about 70 deg F (runny but not hot). Take the domes out of the Freezer, de-mould and place flat side down on a cooling rack over a baking tray. I had a sheet of baking paper underneath to capture the excess. Gently pour over, I started at the middle and used a gentle circular motion slowly moving to the outside. Put back into the Freezer for 5-10 minutes. Repeat the the process and back into the Freezer. Almost done!!!
 To serve I put a bit of the leftover glaze in the middle of the Sablé Breton and using a small offset stepped palette knife gently placed the dome on top. Then Enjoy.