
 I need to start this quick blog with an apology! Some time ago (last year), the lovely people at Steenbergs sent me a sample box which included a small jar of Smokey Paella Blend. Partly due to two separate visits to hospital I had completely forgotten about it (the jar is small at 10g of ingredients) and discovered it recently, so here is my experience of making NOT the national dish of Spain, but THE regional dish of Valencia!
So Paella might seem a simple dish to prepare, but it can be done very badly or really well. My usual trip to the internet and trawling the bookshelf revealed some interesting facts, the main one being our view that Paella is the national dish of Spain, in fact this is not true and actually the tasty mix of rice, protein and herbs and spices comes from the Eastern region of Spain, the Albufera Lagoon (not the holiday location in Portugal)!
So, for 2 – 4 people I used the following Ingredients:
- 2 Chicken Breasts (as good as you can get, chopped into 1 1/2 ” ‘chunks’)
- 20 (approx.) Raw King Prawns (shells removed)
- 1/2 Large Onion (finely Chopped)
- 1 Red Pepper (pith and seeds removed and chopped roughly)
- 6″ Chorizo (sliced about £1 coin width)
- A good glug of Olive Oil
- 1 Clove Garlic (finely chopped)
- 1 Glass Wine
- Zest of 1/2 Lemon
- 2 Tomatoes (Sliced in Half)
- 1 Tsp Tomato Puree
- Salt to taste
- 3 Cups Rice ( I only had Carnaroli in the cupboard)
- 6 Cups Chicken Stock (I used a Knorr Stock Pot which was to hand)
- 2 Tsp Steenbergs Smokey Paella Spice Blend
I am not suggesting my version is original by the way, I used what I had to hand in the cupboard, and took guidance from 5 or 6 pages on the Internet, as well as a couple of books I had that showed different versions of Paella.
 So the 1st stage (for me), was to get some Olive Oil into a pan and start to fry the Chorizo. When you do this, the spices that flavour the Chorizo leach out into the Oil which turns a delicious Red colour. This takes a few minutes, you want the Chorizo a bit crispy to add some texture to the dish.
 Now add the chopped Pepper and fry for a couple of minutes then the Onion. You can see the Red Chorizo flavour doing its stuff on the Onions above. You want to soften things so allow about 5 – 8 minutes for this stage on a medium heat. The next few stages (in my humble opinion), are where you need to take a lot of care with the timing.
 For me, the knack with this dish is to make sure each element is cooked to its best, but nothing is overcooked, we have Chicken, Prawns and Rice which all cook for different times to get right and so some thought needs to go into what we do and when.
The Rice I was using, Carnaroli is an Italian Risotto Rice so if you want to be traditional then Bomba Rice should be used, but the critical factor in my case was the 18 minutes it takes to cook which needs to be factored in with the Chicken and Prawns.
So, in goes the 2 Tsp of Paella mix and the Lemon Zest, spices need cooking out a bit 1st to extract oils and flavours. Next, take your Tomato halves and grate them into the pan, this leaves the skin behind which is not digestible, then the Tomato Puree and give it a good mix.
Turn the heat up and add the wine, you want to reduce and evaporate the alcohol. Now add the Chicken with the heat still up high and cook for a couple of minutes until the outside is browned. The bulk of the cooking will take place when we add the Rice and Stock so it’s just colour and flavour we are adding at this time.
 Now add the Rice, stir a bit, then add the Chicken Stock and mix again. Check for seasoning at this point, mine needed some more salt, taste again and check it’s right. DON’T mix anymore from now on. We want to be as original as possible, apparently the finished dish should have ‘holes’ in the surface and a crispy base (I didn’t manage this and suspect I could have used a higher heat), stirring will prevent this from happening and you could end up with mushy Rice.
 Finally, add the prawns and push them down slightly so they are as covered as much as possible, the heat needs to be reduced to a medium simmer at this point so the Rice can ‘sponge’ up the stock and other flavours, if you remember the Rice only needed 18 minutes to cook so at this point, I needed another 14 minutes for the dish to be ready.
 When the 14 minutes is up turn off the heat, cover the dish with tea towels and leave for another 5 minutes and get your plates etc. ready. You can see the final results above, I forgot to take a ‘piccy’ of the plated results as it was just too tasty to leave alone!!
You can see the Rice is cooked, but not ‘claggy’, the Chicken was soft and just cooked, the Prawns were amazing, again soft and not rubbery, which happens if you take them too far in the cooking process.
From start to finish this Paella took about 45 minutes, including the chopping, cooking and resting. The results were delicious, there was two much for the two of us in reality, this amount could feed 4.
The Steenbergs Smokey Paella Spice mix did its stuff, I added some Garlic as we both like Garlic, and I though the Lemon Zest would complement the Prawns in a subtle way.
When my little jar is finished, I will certainly be adding it to the next order, it’s a great mix of 2 different Paprikas, Garlic, Onion, Rosemary, Saffron and Black Pepper and comes highly recommended.
…………………………….Until next time……………..L8ers…………….
 I love food, or should I say I love food that has character, flavour and maybe a story behind it, as it makes things much more interesting. The area of Southern Asia covers a huge expanse, and includes the likes of India, Pakistan, Bangladesh and Nepal, and its resulting rich and diverse culture and cuisine. There is a mountain of history that defines these distinct areas and that has developed over the years and influenced some of the food that we have become familiar with, including
  Onions seem to form the basis of many dishes that come from the region of Southern Asia and the Korma is no different. Now, I really hate Korma or should I say Chicken Korma, I suspect because of the dishes I have tasted are either from a take-away (once), or one someone close to me has made (I suspect from a Jar, Shhh) again once, I did not like either of them!
 Back to the Onions as there are two different ways they need to be dealt with, sliced and given a liberal salting, and chopping finely. Above you can see above a considerable amount of onions sitting in the colander, once salted and left for at least 30 minutes, the amount of water that gets extracted is quite significant in the picture below. The Onions need to be fried (use a deep fat frier on about 160 degree’s) until golden brown, then drained very well and blitzed with some water to create an Onion Puree. The salting process helps remove much of the water but be careful as there will be a lot of spitting when you put the Onions into the Oil.
 Once completed the aroma is slightly sweet, pungent and just yum, you can see my effort above. I suspect many of the Korma’s in restaurants and in jars have sugar added to provide the sweetness, this recipe has no added sugar (I have just checked two well known sauce brands on the internet and yes, they both have quite a lot of added sugar)!
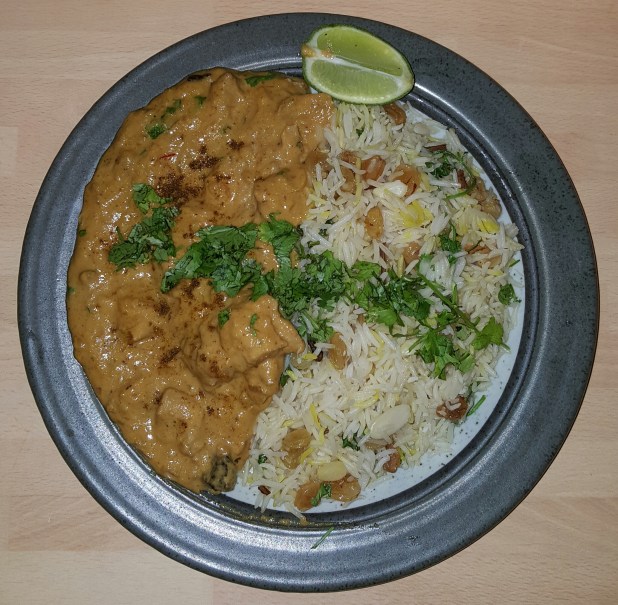
 The other core elements that make this dish ‘sing’ include Black and Green Cardamom, Ground White Pepper, Kashmiri Chilli, Cloves, Cinnamon and Ground Coriander Seeds. To add to the this, a puree of both Almonds and Cashew Nuts are needed along with Saffron, (I used Afghanistan Saffron which comes from a village co-operative encouraged to stop growing drugs, that’s got to be good). The majority of my spices come from
  I had a ‘debate’ with my partner of 27 of so years on the Chicken cut, and I stood my ground (typical obstinate bloke I her you say). I had a pack of Chicken Thighs which would be perfect, but I was battling against Breast Meat which my partner wanted to go with.
 I will admit to cheating a bit with the Rice, and used a couple of packets of the ‘quick cook’ variety but with some added ingredients. Golden Raisins which had been steeped in Earl Grey Tea for a least an hour, some cloves, a little broken Cinnamon stick, a few crushed Green Cardamon pods and a light sprinkling of the Saffron Water, finally some chopped Coriander and a few flaked Almonds, the whole lot goes in the Microwave for 2-3 mins (yes a Microwave)!
 So, the Korma hating critic was gobsmacked, this was bl@@dy amazing with deep flavours, a slight nuttiness but not too much, sweet but not sweet (the Onion puree I guess), this was just sublime. The Kashmiri and Ginger (I didn’t mention the Ginger so you do need the book to recreate this 🙂 providing some heat long with the White Pepper.
 The usual disclaimer as this is a review, I paid full price for this course and received no incentives to publish this review, what you read is what you get, now onto the serious stuff!
 A bit of research and I had found a likely candidate at the cooking school I use the most (in the U.K.), Richard Bertinet in Bath. It’s a great setup on 2 floors so sometimes 2 different courses can be run at the same time, I had already attended more than 3 courses previously and all had been fantastic so the risk was minimal.
 We took the train to Bath, and Taxi to the School as it’s a very steep walk and we needed our energy for cooking! On arrival we were greeted with massive smiles and a very warm welcome by Fionn who helps manage everything behind the scenes at Bertinets’ and is brilliantly organised, and our tutor for the day Jenny Chandler.
 There were 2 other children on the course, I think the parents were more nervous than the kids but we all got on really well as we started to understand what was going to happen for the next few hours, it’s a ‘proper’ cooking course but aimed at little ones.
 The next item on the agenda was a Chowder, blimey that’s quite advanced for adults let alone children at 10 years of age, this is where the knife skills were introduced. Jenny carefully explained how to use a knife to SAFELY cut Onions which were needed for the Chowder. Chop, chop, chop and soon the Onions were slowly frying in the pan as explanations about how to cook them correctly, to translucent stage!!
 Meatballs were next, three different versions were produced showing how the same basic recipe could be used to make dishes with completely different flavours, at the same time, the method of testing before cooking a whole batch enabled seasoning to be introduced to ensure the end result tasted correct.
 The school is very very well laid out with lots of room, each person having their own cooking station and stool to rest their weary feet if needed, and enough knives, bowls etc to go round so no one was left out.
 I have to say that I think the adults enjoyed the cookery as much as the 3 children, it was quite hard work for all of us, concentrating on Jenny’s instruction and helping from time to time where needed.
 I will admit from the start that whilst this dish tasted amazing it needed at least another hours cooking, so allow a good 6 hours for this beautiful dish, voted
  With the weather cooling slightly something warm and fragrant was in order, so looking at various cookery books,
  The Beef Short Ribs are BIG! I took the time to put some colour on them first, giving them a burst of heat on each side before starting on the rest of the process. I think next time I cook this dish I will try Ox Cheek which is a great cut of meat for slow braising and has slightly less fat content, and is easier to handle 🙂
 There are quite a few ingredients in this dish and the Star Anise, Cardamon, Cloves are fried in a little oil to release their flavour, before adding a single ‘bashed’ Lemongrass shoot. Then the spice mix is added and fried for a few minutes, finally add the Beef, Coconut Milk, Tamarind some water, Palm Sugar and
  Kerisik is ground Coconut that has been fried until golden brown and can be made using desiccated Coconut if you cannot find fresh, again there are lots of references on the web, you can see my 1st attempt below.
 Kaffir Lime leaves are also added, I could not find mine so used some lime zest instead. The whole lot now cooks and cooks and cooks, this is a low and slow dish. There are several stages to the process which I had somehow missed (they are in the Rendang Wiki link above), the 1st stage is easy as you can see above. After approximately 3 1/2 hours, the mixture had reduced and I saw the Oil on the surface and this is where I went wrong, as I removed it, rather than letting the dish carry on cooking allowing for more evaporation, colourisation, and the flavours penetrating the meat.
 You can still see lots of moisture above, the dish should be much dryer but I now know for next time. I also think that using the food processor was a bad idea, as pounding in a pestle and mortar would have produced a better textured spice paste, but cooking is about learning so some more things to remember and lessons learnt.
 So there you have it, it almost worked if only I had left the dish cooking for longer until the meat was darker and the moisture evaporated completely. My attempt would not have won the CNN best dish award but it was still very tasty and the meat tender, the Rice with Pandan was a great addition.